abbott3serr's Blog
What is true and what is false: Lace front wigs are detrimental to the health of your hair and should be avoided at all costs


Cast Aluminum: Which Is Better

Cast iron skillets, fryers, and pans, which are black, heavy, and quick to heat, are popular among cooks who recognize that cast iron has numerous advantages over other materials for skillets, fryers, and pans. But what about aluminum alloys such as cast aluminum? However, cast aluminum cookware, while not as well-known as its iron counterpart, has a lot to offer both home and professional chefs in terms of functionality. If you enjoy cast iron, you might enjoy cast aluminum even more.

In fact, scrubbing cast iron with soap and water, in particular, can cause it to rust or corrode. To prevent food from sticking to cookware made of either metal, it is recommended that it be seasoned with oil and spices to form a protective, non-stick coating. Food particles can then be scraped out and disposed of between uses.

Pans made of cast aluminum are lighter.
It's possible to get the same amount of flexibility from a cast aluminum pan, but without the risk of dropping a too-heavy skillet while transporting it to and from the oven. Just keep in mind that lightweight cookware is also more prone to accidentally falling off the counter and spilling hot food if an errant elbow strikes the handle of the pan while cooking. Both cast iron and cast aluminum have their advantages and disadvantages, but many people prefer cast aluminum because of its lightweight nature.
Holding Heat and Heat Time are two different things.
When you notice that one part of your pan cooks more quickly than the other, aluminum die castings can be extremely frustrating. One of the most common reasons why people seek out cast iron or cast aluminum cookware in the first place is the desire for consistent heat distribution. Furthermore, both metals not only distribute heat efficiently, but they also retain heat with little resistance.
Cast iron, on the other hand, is the winner when aluminum alloy die casting comes to retaining heat, owing to its greater mass. Adding cold or room-temperature food to the pan will not affect the pan's ability to maintain its heat, so don't worry. The aluminum pans may require a minute or two of preheating before they can be used again.
If you've ever visited an antiques market or a flea market full of cast iron cookware, you might be surprised at the variety of options available. Those pans, despite the fact that they may be decades old, are frequently still in good condition. Cast iron can be passed down through the family in excellent condition, but cast aluminum, its cousin, is unlikely to be found in an antique shop in the same condition.
The natural acidity of foods causes them to react with aluminum, and even though those acids are relatively mild, frequent use still causes cast aluminum cookware to become unusable in a matter of years, rather than decades, as is the case with its cast iron counterpart. Aluminum is also more prone to scratches as a result of the use of sharp utensils.
Are Aluminum Cookware Dangers a Thing of the Past?
If this is a concern for you and you have untreated aluminum cookware, avoid cooking acidic foods such as tomatoes in it because the acid is what causes the unfavorable reaction between the aluminum and the acid. Some people also claim that it imparts a bland metallic flavor to food. If you want to completely avoid this problem, look for aluminum cookware that has a stainless steel coating or that has been anodized, which means it is non-reactive.
Cast Aluminum vs. Cast Iron: a comparative analysis
Cast aluminum is lightweight, heats up quickly, does not retain heat as well, has a shorter lifespan, and is typically less expensive than steel.
Cast iron is heavier, heats up a little slower, holds heat better, and lasts longer than stainless steel. zinc die casting is typically more expensive, but is readily available.
Both need to be seasoned in order to be used as non-stick pans, and neither should be washed in the dishwasher unless you purchase an enameled version. If you aren't already firmly entrenched in one camp or the other in the cast aluminum vs. cast iron debate, you simply must give them both a shot and see how you feel about them.
It is possible to connect an OLED to the Arduino board for programming purposes by using the SPI and I2C interfaces on the board at szmaclight.com
It is perfectly acceptable that you are able to look over this file yourself; however, I am only interested in showing you the finished product, so I will load this file into my Arduino IDE and upload it to my Arduino. Thanks for taking the time to read this. Please do not hesitate to contact me if you have any questions. Despite the fact that you are welcome to look through the file on your own, I will not guide you through it due to the fact that it is extremely complicated. As you progress through the course, you are, of course, welcome to ask questions at any point during your participation. As you can see in the images below, I connected it to the Arduino using the cable that they provided because their cable has a female connector, and in the following image, you can see how I connected it to the Arduino using a very short cable because their cable has a female small oled display because their cable has a female square LCD display. You can see a live demonstration of our wave share tft display by visiting this page.
Closer examination reveals that it appears to be a fairly impressive demonstration. According to what you can see, the tool has a variety of symbols on it to demonstrate the various things that can be accomplished with the tool in question. As well as this, there is an fictitious middle clock and some text, all of which are exceptionally clear and easy to read, even in bright light. More in-depth examination of what is taking place is necessary in order to gain a better understanding of what is occurring. If you could take a closer look at the following screen, I'd greatly appreciate it. In addition to its simplicity and ease of visibility, it is an excellent display to include in your projects, even when working in bright workshop lighting conditions.
Because it can be used both as an AI and in conjunction with the SPI bus, this project has a wide range of applications that it can be used for. It can also be used as a bus, making it a highly adaptable piece of equipment that can be put to use in a variety of different situations and environments.

Raspberry Pi Oled Display I2C SSD1306 Display Module Interfacing and programming
If you want to use all of the LEDs in your own project, look at the sample code to see how you can print directly to the OLEDs. If you don't need all of the LEDs, but still want to use some of them, look at the sample code to see how you can print directly to the LCDs. The number of graphics routines you have to link together is likely to be large, and it's possible that some of these samples will be too much for you to handle all at once. As a result of their extremely long length and ability to connect a large number of graphics routines, they are used in this manner. In the case of an OLED monochrome LCD display, dealing with a small amount of data can appear to be a very complicated task to complete. For example, using fonts on an OLED display can appear to be a very complicated task to complete.
Using an OLED display to measure temperature and humidity, I was able to make things a little bit simpler by creating a small one-off project. This was done in order to make things a little bit easier for myself. Please bear with me as I walk you through the code, step by step, to ensure that you understand how to print text on an OLED display. I appreciate your understanding. Please be patient with me while I complete this task. The OLED small oled display will not have any graphics, however; only plain text will be printed on it, and it will be visible to the user as it is displayed on the screen. However, this is where things start to get interesting:After receiving the text message, the -3-0 sensor is activated first thing in the morning to alert the user. Even though it looks and functions exactly like the dht11 and dht22, and even though it performs precisely the same functions as a temperature and humidity sensor, it is an i2c device, and I have previously used it in a project with which I am familiar.
As a result, you may recall that I used it in a previous project; as a result, it is an i2c device, which you may recall, which you may recall, which you may recall, which you may recall, which you may recall, which you may recall, which you may recall, which you may recall, which you may recall, which you may recall, which you may recall, which you may recallAside from that, an i2c monitor will be used as a supporting tool in this project...
First and foremost, let us think about how we will connect the thermometer and hygrometer together, keeping in mind that I will be using a 128x64 display as a reference. In the same way that we integrated the eye to square LCD display into the system's overall functionality, we'll incorporate temperature and humidity sensors into the system's overall functionality through the use of the AM-3 to 0 circuit. You will be guided through the code in the following section so that you will understand how to incorporate it into your own project and make it work properly.
To ensure that the sensors are properly connected, it is recommended that they be connected in the following order: starting from left, connect the first pin of each sensor to the first pin of VCC, which is the 5 volts supplied by the Arduino, then the next pin of each sensor, and so on. The second pin on a computer keyboard's HDMI TFT display module cable is designated by the letters SDA on the monochrome LCD display cable. There is also an analog one4 connection available on the board in addition to the SDA connection, which is connected to Arduino's second pin. This is a nice addition to the board's functionality.
This pin on the Arduino is used to represent the ground plane in a virtual environment. The SCL connection on the Arduino is represented by the analogue A connection on the pin immediately to its right, which is represented by the pin immediately to its left. A representation of the SCL connection can be found on the Arduino's analogue B connection, which can be found on the pin immediately to the left of the SCL connection.5 Consider the sketch below, which will be used to display the current temperature and humidity on the OLED display after our temperature and humidity sensors have been successfully connected to the computer. This image depicts an OLED display that will be used to display information about the current temperature and humidity levels in the surrounding environment.
What are CNC machining incomparable advantages and how can you quantify them

A type of process known as machining includes compound machining, which is also known by the names of turning milling and turning lathes, among other names. When it comes to completing the machining of various surfaces on the same machine tool, CNC turning and milling services is not enough to simply combine turning and milling operations into a single machine tool; CNC milling parts compound machining also incorporates CNC mill machining synthetic motion to complete the machining of various surfaces on the same machine tool. As a result of the rapid advancements in numerical control technology, the development of a new cutting theory as well as a new cutting technology has taken place. Below, we'll go over the types of people who can benefit from turn milling compound machining, as well as the incomparable advantages that can be obtained as a result.
Other manufacturing methods are outclassed by the advantages that turn milling compound machining has to offer. What are these benefits, and why should you choose this option over the alternatives, you might wonder.

Because clamping times have been reduced, is less likely that it will occur during the clamping process. This reduction in clamping times also has the additional benefit of preventing error accumulation caused by the transformation of the positioning reference. However, the vast majority of current turn milling compound processing equipment is equipped with on-line detection capabilities, which enable the detection and accuracy control of critical data during the manufacturing process, resulting in improved processing accuracy of the finished product. By incorporating a high-strength integrated bed design into your machine, you can enhance the gravity processing ability of difficult-to-process materials. With the assistance of an automatic feeding device, the machine tool is capable of performing automatic feeding for continuous operation, essentially allowing it to perform assembly line operations with a single machine tool and in a single setup.
However, despite the fact that turn milling compound processing equipment is relatively expensive in terms of a one-time purchase, the reduction in manufacturing process chain length, the reduction in product-specific equipment, the reduction in the number of tooling and fixtures, the reduction in workshop floor area, and the reduction in equipment more than make up for this by providing the highest possible level of customer satisfaction to the manufacturer.
Two important objectives are to increase the efficiency of product processing technology while simultaneously decreasing the amount of product processing technology that is used.
The new tool arrangement can reduce the amount of time spent changing tools while at the same time increasing the efficiency of the processing. Turn milling compound processing, when combined with other manufacturing techniques, can result in a significant reduction in the amount of time required to complete the product manufacturing process. That's because one-time clamping and the ability to complete all or the majority of the processing procedures in a single operation enable significant time savings. In addition to reducing the amount of time spent changing clamps, increased processing efficiency can be achieved by decreasing the amount of time spent waiting for tooling and fixtures throughout the manufacturing process.
With a machining center, is possible to perform both turning and milling operations on a single machine.
Complicated machining, also known as turn milling or turn milling compounding, is a machining technique that involves clamping parts together at the same time in order to complete a variety of machining operations on a single piece of material. Additionally, it decreases the amount of time required for machining while simultaneously increasing the accuracy and efficiency of the machining operation. Comparing turn milling compound machining to other machining methods, it demonstrates that is incomparably superior to the latter. CNC turning and milling services is capable of turning, milling, and other types of compound machining because it combines the capabilities of several machines in a single operation. The turn milling concept, in which the entire operation is completed in a single operation, can also be realized with the help of this machine.
Is it possible to quantify the contribution that CNC parts make to the advancement of manufacturing technology
A straightforward way to think about CNC machines is to consider them to be traditional machines that have been enhanced by the addition of computer control and, in some cases, the ability to operate on multiple axes. In the manufacturing industry, different types of CNC machines are used in different sectors, depending on the operations that need to be performed on the machine tool. Using a CNC lathe, you can perform machining operations that require cuts to be made in a circular direction. Furthermore, unlike manual lathes, a CNC laser can be used to create complex geometries, which is not possible with manual lathes. A CNC laser can also be used to cut through solid materials. The CNC Mill, Water Jet Cutter, Plasma Cutter, and other numerically controlled machines (CNCs) operate in a similar manner, enabling users to perform additional processes that would be either too complex or impossible to perform on a manual machine.

A result of the numerous advantages that CNC machining services provides over traditional machining, it has come to be recognized as the clear choice for any manufacturing facility wishing to use CNC machining service in place of traditional machining. It is critical to be as precise as possible. All in all, the tolerances of CNC-machined parts are superior to those of conventionally machined parts, and their repeatability is unrivaled in the manufacturing industry. CNC machines, on the other hand, can maintain their precision throughout the day and can produce significantly more parts in the same amount of time as a human operator; on the other hand, human operators' performance can be adversely affected by a variety of external factors, and their precision will gradually deteriorate over time. The use of CNC parts simplifies the process of rapid prototyping, allowing your plant to continue operating without interruption as a result of this advancement in technology. As a result, the acceptable tolerances for machined products have shrunk dramatically in recent years, with modern machines capable of providing tolerances as much as a factor of ten thousand three greater than those previously available. Especially important in industries such as aerospace and defense, where applications requiring high-intensity operation are required.
The use of CNC Parts is also important in the metal fabrication industry, where a variety of operations on metal sheets are performed with extreme precision thanks to the use of CNC Parts. CNC Parts are also important in the aerospace and defense industry. A growing demand for more precise and accurate machining is emerging as a result of the growing interest in nanotechnology around the world. Computer-controlled machining (CNC) can help meet this demand.
As a result of the accuracy of the machining procedure used to create them, CNC aluminum parts can be difficult to work with during the fabrication process. This is true even though they are far superior to conventional aluminum parts in terms of strength and durability. Excessive heating during CNC machining service of aluminum parts is the most common cause of deformation and, in some cases, complete melting of the part. This occurs as a result of the fact that not all aluminum alloys are suitable for CNC machining services and that when creating CNC aluminum parts with a CNC machine, selecting the appropriate feed rate and tool is extremely important. To manufacture machined aluminum parts, it is necessary to have a highly skilled numerical control operator who understands how to select the most appropriate cutting parameters in order to achieve the best possible results. Throughout their careers with us, each and every one of our employees has received extensive training in the production of custom machined parts that are tailored to meet your exacting specifications. In addition to selecting the most appropriate parameters, it is possible to improve the results even further by employing a variety of additional techniques in addition to those already mentioned. For example, the following are some examples of these strategies:
The heat is distributed more evenly across the work piece as a result of the use of this technique, resulting in improved heat dissipation throughout the entire operation. We are able to avoid heat concentration on the part as a result of the use of this technique, which ultimately results in less deformation of the machined part.
While stratified machining is being performed, this term refers to the process of stratifying a piece of equipment that is being carried out at the same time.
The characteristics of the cutting tool, despite the fact that it should go without saying that they would be critical in the machining process itself, should be mentioned for completeness' sake. Cutting tool geometry and material properties work together to allow the user to control both the amount of force applied to the part and the amount of heat dissipated from it during the cutting process. When the angle of the part's front and rear faces are varied in a controlled manner, it is possible to modify its front angle, back angles (including helix angles), and main deflection angle (including main deflection angle), as well as its average temperature in the processing area.
Despite the fact that combining the techniques described above with other techniques can improve the performance of some aluminum alloys, not all aluminum alloys are suitable for precision machining processes. A metal alloy with mechanical properties that are suitable for the process in question should be preferred over other options when deciding which alloy to use for a particular application. To name a few of the more common alloys, some of the most commonly used aluminum grades for CNC parts are 6061, 7075, 2024, 5052, and 6063, to name a few of the more common grades of aluminum used for CNC parts.6061 aluminum is the most commonly used grade of aluminum for CNC aluminum parts, and it is also the most expensive.
The Origins of Cardboard Mailing Boxes: An Overview of Their History
You might be wondering what we would do if we didn't have access to cardboard boxes. Here's what we would do. In fact, that's precisely where you'll find me: a complete and utter disaster. The ground was littered with apples and toys, which was a welcome sight. A strewn collection of books covers the entire floor of this room. When it comes to moving house, storing clothes, or entertaining small children, an old-fashioned cardboard box will always do the trick. But, perhaps more importantly, from where did they originate in the first place? In 1817, an English company called M. Treverton & Son was established, and it is this company that is credited with the invention of the first cardboard box (or, more specifically, the first paperboard box). M. Treverton & Son is still in business today, and it continues to innovate. Germans became the world's first country to use cardboard box packaging in the same year as the United States. Putting a cardboard box together is a straightforward process.

Invented in 1890, the Folding Box was the first of its kind.
Scotland has been credited with the invention of numerous technologies, including the telephone, television, and tarmac, so it should come as no surprise that they were also involved in the development of cardboard boxes. The pre-cut cardboard box was invented in 1890 by Scottish inventor Robert Gair, who was born in Glasgow. The pre-cut cardboard box was a flat piece of cardboard that was manufactured in large quantities and then folded into the appropriate shape. It was a fortunate accident that led to this discovery while Gair was working as a Brooklyn printer and paperbag maker in the 1870s that led to the creation of this device. During the printing of a batch of seed bags, a metal ruler that was normally used to crease the bags shifted in position and cut through them, prompting him to invent the seed bag, which would go on to become widely used. It is as if the author has exclaimed, "Eureka!"Gair was overjoyed when he discovered that he could create prefabricated paperboard boxes by cutting and creasing at the same time. In the late nineteenth century, when corrugated boxboard became available, it was a straightforward matter of transferring the concept to the new material, which was a straightforward development.
Breakfast in Cardboard Boxes is a popular choice for many people in the Philippines.
The introduction of light flaked breakfast cereals has resulted in an increase in the use of cardboard boxes, which is good news for the environment. In an unusual turn of events, the Kellogg Company was one of the first companies to use cardboard boxes as cereal cartons, and they have continued to use them to this day.
The Application of Corrugation as a Tool for Inventive Thinking

After being patented in England in 1856 for use as a liner for tall hats, corrugated or pleated paper became widely available in the United States after being introduced in the country by the textile industry. Corrugated boxboard, on the other hand, was not patented until 1871, and it was not used as a shipping material until that year, when it was used for the first time in the shipping industry. Inventor Albert Jones of New York City, who is credited with the invention of single-sided corrugated board, was granted a patent for his creation in 1903. The corrugated board was used to wrap the bottles and glass lantern chimneys before they were transported to their final destination, according to Jones. Jones' design was improved upon the following year by Oliver Long, who created corrugated board with liner sheets on both sides, which was patented in 1875. A machine for producing large quantities of corrugated board was invented by G. Smyth in 1874, and Oliver Long improved on Jones's design the following year by developing corrugated board with liner sheets on both sides, which was patented the following year and became widely available in 1876. Today, we are all familiar with corrugated cardboard, but this was the material that inspired it in the first place. The introduction of the first corrugated cardboard box manufactured in the United States occurred in the year 1895, when a box was manufactured in the state of New Jersey. The use of corrugated paper shipping cartons began to displace the use of wooden crates and boxes in the shipping industry as early as the first decade of the twentieth century. One of the reasons for the widespread use of cardboard box was the fact that they were significantly lighter and easier to handle than their metallic counterparts.
The sensation is as if boxes are protruding from the back of our ears.
It doesn't matter if you're moving house, putting things in storage, or putting together an indoor playhouse; there's a box for every occasion. Every item you could possibly require is available at our store. The corrugated cardboard packing boxes that we provide are available in a number of different sizes, including small, medium, and large sizes. An unusually large number of cartons containing plasma televisions have been found in our possession. In pre-packaged sets, mirrors and picture frames can be purchased separately. We have value packs of our products available, which contain ten medium-sized boxes of each of our items. We are fortunate in that we have a wardrobe box, which serves as the ideal carrier for hanging garments and other items. We even design shoe boxes specifically for our customers. Considering the evolution of cardboard boxes over the last 200 years, there has been a significant shift. Visitors to our King's Cross and Bow receptions can peruse the extensive cutting-edge collection we have on display, which will give them a sense of how far the company has come in such a short period of time, as well as the company's other locations. In the event that you enjoy cardboard boxes, it is unlikely that you will be dissatisfied with this product.
Aspects of acrylic drilling that frequently cause issues include:
Because of the unique properties of acrylic material, drilling it presents a number of unique challenges that must be overcome in order to complete the task.
Being aware of and understanding the potential difficulties, causes, and solutions associated with the situation in which you find yourself is critical to your success.
Nonetheless, it is important to keep in mind that such issues are frequently unavoidable, making it difficult to predict when they will occur.
Over the course of this section, we'll look at some of the most common issues that can arise when acrylic drilling is performed, and we'll discuss how to deal with them or avoid them altogether in the first place.
dicing and dicing it up
drilling acrylic material will almost certainly prove to be one of the most difficult challenges you will ever face, as you will almost certainly discover.
The lips of your drill bit and the cutting edge of your drill bit are examples of where this can occur in this situation, as shown in the image below.
The most common cause of chipping on the lips of your drill bit is an excessive amount of lip clearance on the lips of the drill bit, which causes the lips to become brittle with time.
In addition, a lack of clearance causes the drill to split the web as a result of the lack of clearance. This is the second reason for this.
A viable option in such circumstances is to repoint the drill bit or, better yet, to replace the drill entirely.
On the other hand, a large run out after attaching the drill, as well as a loose holding fixture, will typically result in chipping on the cutting edge of the drill bit.
Simple solutions to this problem include double-checking your holder and making any necessary adjustments, or better yet, selecting a completely different one.
It may be necessary to reduce the cutting speed or feed rate as a result of excessive cutting speeds in order to prevent further damage from occurring.
Melting is a natural process that takes place in the body.
In the event that you are drilling through acrylic material, it is almost certain that you will experience melting as well, which will further complicate your situation.
Drilling through a surface causes friction, which causes the temperature to rise, especially when the drill bit is drilling at a rapid rate, as shown in the diagram.
Due to the above-mentioned conditions, it is relatively easy for the acrylic surface to begin melting.
The only ideal method of preventing melting, according to the current situation, would be to reduce or significantly regulate the drilling speed, which is currently impossible due to technical constraints.

There is also the option of pouring water, which serves as both a lubricant and a coolant at the same time.
Holes that aren't perfectly round are called imperfect round holes.
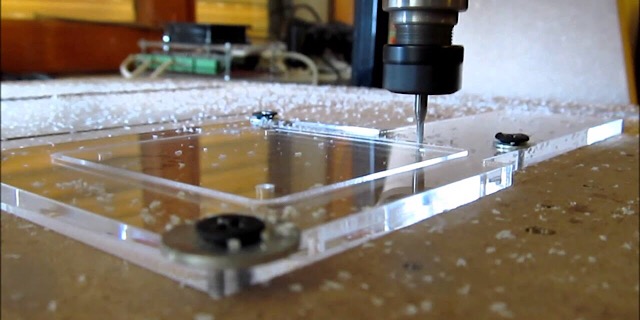
One of the most common causes of inconsistent holes is shaky clamping of the acrylic material, which occurs as a result of the machine's vibration.
It is necessary to tighten the clamps that hold the materials in place during the process because the drilling machine is extremely powerful, as you can see in the video, and this is demonstrated in the video.
As a result, the most effective method of dealing with this is to ensure that the material is tightly clamped in place.
As previously stated, another possibility is that the drill bit is not securely fastened to the chuck when it is used.
Due to the rotational motion of the drill bit in this scenario, irregular holes are produced as a result of its rotational motion:
The ideal solution, in this particular instance, would be to make certain that the drill bit is securely attached to the machines in question.
This step-by-step tutorial (complete with photographs) will teach you how to make an acrylic tablet stand
Making an acrylic tablet holder is a simple and straightforward project that can be extremely beneficial, especially if you suffer from chronic neck and arm cramps as a result of spending too much time staring at your tablet's display screen. There are a variety of materials required for this project, including but not limited to an acrylic sheet, two slats, two glue clamps, a paint burner, and a paint burner. These are some of the materials required for this project. The pleasure you will receive from investing only fifteen minutes of your time is equivalent to years of your life spent working.
The first step in the process involves starting with the most appropriate basic material, such as acrylic resin in the form of a cast, and working your way up from there.
There are a variety of home improvement stores where you can purchase the acrylic sheet you'll need for this project; however, the acrylic sheet available in these stores is less suitable for this project than the acrylic sheet available in other places. It is recommended that cast acrylic rather than sheet acrylic be used when constructing the acrylic tablet stand holder in order to prevent the holder from warping during the construction process. We will cut the sheet to your exacting specifications with only three millimeters of sheet thickness required and at no additional charge. Your acrylic painting can be painted in any pleasing color you choose; the choice is entirely up to you!
The dimensions of your tablet computer or laptop are dictated by the size of your tablet computer or laptop, which in turn determines the dimensions of your tablet computer or laptop. According to general rule, if you own a home or live in an apartment, the following items should be kept around the house or in your apartment on an ongoing basis:Following is a breakdown of the specific measurements:The following are the measurements:height plus 5 centimetres, width plus 3 centimetres are the dimensions. To illustrate, consider the following scenario:In order to determine the length and width of an acrylic sheet that is 65 centimeters in length and 23 centimetres in width, divide each dimension of the tablet's height and width by the number of centimetres it has in width.
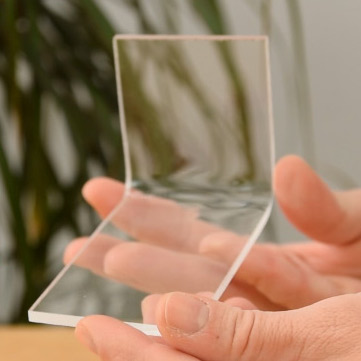
Without the use of any special tools, acrylic can be shaped in a few simple steps with minimal effort.
A protective film is applied to both sides of the acrylic sheet during the manufacturing process in order to prevent the material from becoming distorted or damaged. The use of aluminum foil to hold the material in place while it is being bent is a good idea. While you are bending the material, you can use the foil to mark the fold lines as you go along the fold line. It is necessary to draw a strip of tape three centimetres wide across the bottom fold line of your tablet (the point where the bottom of your tablet meets the bottom of your tablet) in order for it to be properly folded. The second fold line is 30 centimetres higher than the first fold line, or 33 centimetres from the bottom edge; it is also 33 centimetres from the bottom edge of the first fold line, which is also 33 centimetres from the bottom edge of the second fold line; and it is 33 centimetres from the bottom edge of the second fold line. To account for differences in tablet size, it should go without saying that the distance between you and the tablet will be increased or decreased in direct proportion to the difference between their respective dimensions.
Fold line completion can be achieved by placing wooden slats under and above the fold line, with the slats running exactly parallel to the fold line on both sides of the fold. Line that has been folded and refolded numerous timesFor the time being, the glue clamps are being used to maintain the position of the slats while the rest of the installation is being completed. Your folding line will now be heated to the desired temperature using the paint burner / hot air gun that you purchased earlier in this process. In order to achieve the desired results, the temperature should be set to medium and the blower speed should be set to high. Gently move the hot air gun from left to right over the folding line while keeping the hot air gun ten centimetres away from the acrylic. Continue to move the hot air gun in a single fluid motion from left to right until the folding line is completely erased. Create an everyday routine that includes regular bending of acrylic. If the material is flexible enough, try to bend it up 90 degrees each time it is bent to avoid the material becoming stiff. After that, turn off the hot air gun and hold the bent part in place for approximately 1 minute, allowing it to cool and return to its original shape before proceeding with the project. When this happens, the acrylic hardens once more, and any potential problems with a folded surface are eliminated.
It should be folded in a manner similar to the first, with the second fold line, which has been heated and bent as previously described, serving as the starting point. Because this fold will be at a much sharper angle than the one that came before it, it will be the most noticeable difference between it and the one before it. Heat the folding line and bend it at an angle as needed before continuing. . he folding line should be warmed a second time before bending the tablet stand into the desired position. Holding the position described above for two minutes, or until the acrylic feels cool to the touch of your hand, repeat the procedure as described above while maintaining the previously mentioned position. After removing the protective film from your tablet holder, you can immediately begin using your tablet in your home or office setting.
How Can I Prevent My Wigs From Slipping
It is intended to be humorous, but wearing a wig is no laughing matter; you don't want your wig to fall out while you're out and about in public. It also contributes to the cleanliness of your wig by acting as a barrier between your head and the wig.
Make a looping motion with your wig cap around your head, either from the back to the front or the front to the back. A wig cap is similar to a swim cap in that both are tight and must be stretched over your head in order to be worn. After you've stretched the wig cap over your head, tuck any existing hair up under the wig cap to conceal it.
Place the wig over the wig cap and secure it in place on your head. Using your fingers, lift the hair on your wig up to reveal its underside. Then, using bobby pins, fasten the wig cap to your wig by placing them over the mesh under the wig. Insert bobby pins at the front, sides, and back of the wig to keep the wig attached to the wig cap firmly in place.
Place the wig tape directly onto your scalp and remove the protective cover from the tape to reveal the second sticky side. Repeat this process for the other side. Place the wig cap on your head and press it down firmly to ensure that it is securely attached to the wig cap tape. Bobby pins are used to secure the wig to the wig cap after it has been placed over the wig cap. Instead of using a wig cap, you can place the wig directly on top of the sticky wig tape and press the wig down to ensure it adheres to the adhesive.
Take a look at the length of your hair. In order to achieve this hairstyle if your hair is shorter than your shoulders, you will most likely need to add length to your locks before you can achieve it. Even if your hair has grown past your shoulders, you may still want to make it longer in order to achieve Elsa's look in its fullest form.
Extensions should be added. The use of wholesale hair vendors extensions can extend the length of your hair to the same extent as Elsa's does.
color hair lace closure wigs extensions are available in a variety of textures and lengths. Human hair extensions are available, as well as synthetic hair extensions. Human curlyme hair extensions are more expensive than synthetic hair because they can be cut and styled however you want and because they last a long time. Synthetic hair is easy to style and can be worn with little or no effort. It does not last as long as human hair, but it is significantly less expensive than human hair.
Hair extensions can be applied in a variety of ways, and they are available in a variety of quality and price ranges. There are three types of extensions: clip-in, glue-in, and tape-in. These are simple to use, are inexpensive, and are easy to remove. Sew-in extensions, also known as a weave, are more time-consuming to apply but last for a longer period of time. Additionally, cold fusion and hot fusion extensions are available. Although these methods are more expensive, they last significantly longer than other methods.
Get yourself a wig. A wig can be used as an alternative to hair extensions. Any color wig will do, but a light blonde wig will look the most like Elsa if that is what you want to look like in the movie.
Increasing the volume of one's HD lace
Make a comb through your hair. Clean, dry, and tangle-free HD lace wigs should be your first priority. If you have extremely curly hair, it may be easier to work with if you blow dry or straighten your hair before beginning your project.
Texture is important. Texturizing spray should be sprayed throughout your hair and scrunched with a finger to create volume. Using this method, you can increase the volume and wave of your hair.
Do Elsa's Snow Queen Hairstyle from Frozen is the title of this image. The first step is to identify the problem.
Take a section of real hair wigs from the top of your head and separate it from the rest of your headband wigs on the sides of your head. Back comes with a teasing comb at the roots of the section, just below the section. Repeat the process with many different sections at the top of your head, making sure to back comb at the root of your human hair for black women each time. Then, using a smoothing brush, gently brush your hair back to smooth out any teased pieces that have gotten out of place.
Do Elsa's Snow Queen Hairstyle from Frozen Step by Step is an image titled
Make a bump in the ground. Replace two small chunks of hair on the right side with two small chunks of Brazilian human hair bob wigs on the left side and repeat the process. You should be able to eliminate any hair part by twisting these sections toward the middle of your head. Make sure all of the twists come together in the middle and are slightly pushed up to add volume to the look. The twists should be held together with bobby pins. You should have a "bump" in the front of your hair at this point.
Braid the rest of your hair in a ponytail. Make sure not to overdo it by tying it too tightly. Make a secure hold with an elastic hairband, preferably one that is clear.
Lightly tug on each piece of the braid to keep it in place. This will help to spread out the braid and make it appear fuller. Continue tugging and loosening the braid until you reach the very top, where the bobby pins from the bump are located, then stop.
Putting the finishing touches on the look
Pull the braid all the way to the left. To make Elsa's hair appear, wrap the braid around your left shoulder so that it rests on your left shoulder.
Spray your hair with hairspray. To finish the look, spray your hair with a strong texturizing hairspray to hold the style in place. It will be more perfectly undone the way Elsa's hair looks if you use a texturizing hairspray to achieve this effect.

Each type of casting process has its own set of advantages and disadvantages to take into consideration which are detailed below
Investing in casting is a term used in the casting industry to describe the process of putting money into investments, which can be defined as follows:
Investment casting, also known as lost wax casting, is a sophisticated metal forming process that can be used to create both solid pieces and hollow cores from metal. It can be used to create both solid pieces and hollow cores from metal. It can be used to create both solid pieces and hollow cores out of metal, depending on the application. Depending on the application, it can be used to fabricate both solid pieces and hollow cores out of metallic materials. Depending on the application, it can be used to fabricate both solid pieces and hollow cores out of metallic materials, depending on the material used. Once used, our disposable templates are used to manufacture high-quality metal components that can be thrown away after they have finished their function.
Using a special tool, it is possible to create a pattern by injecting wax into a metal die, which allows for the creation of intricate designs. To be more specific, this pattern is an exact replica of the final section of the project's final section, right down to the smallest detail. The casting services are waxed and then fired at a high temperature after the ceramic coating has been applied in order to harden the surface and hollow them out for use in other applications. Afterwards, the mixture is poured into the mold's hot cast exterior shell, which is then finished in the following step to complete the mold construction process. Before disposing of the metal, it is necessary to blast away each and every piece of ceramic that has become adhered to the surface of the metal. Materials can be evaluated using a variety of techniques, including chemical, physical, and nondestructive testing (NDT), among others.
When casting metal, a mold is filled with sand, and the resulting finished metal is poured into the mold to produce a finished piece of metal.
If you are interested in mold-making, you should be aware that sand casting is a technique that involves the use of finely ground spherical grains that are tightly packed together on a smooth molding surface in order to create a mold for a variety of different materials. Production of both large and small pieces of artwork can be accomplished at a low cost using this technique.
Additionally, sand core boxes and wooden or metal patterns should be considered in conjunction with machine casting pieces, as should sand core boxes and wooden or metal patterns in conjunction with machine casting piecesThe first step in the molding process is to pour the component into a sand mold. This is known as the pouring step. The term "pouring the component" is used to describe this method of construction. In order to remove any remaining imperfections and bring the machining procedure to a successful conclusion, the metal is blasted or otherwise surface treated after it has cooled down.
It is the process of pressing a solid piece of metal through a die to form another solid piece of metal that is known as die casting. In the world of metal casting, die casting is one of the most common types, and it is used in a wide range of applications.
Die casting processes for the metal die casting industry are available to customers in a variety of configurations. Cold chamber die casting, hot chamber die casting, and multi-slide hot chamber casting, to name a few of the processes, are among the most common. It is common to use hot chamber die casting in large-scale production of magnesium, zinc, and other low-melting-point alloys, as well as other metals, because of its high efficiency. Cold chamber die casting is a viable and increasingly popular alternative for metals with high melting points, such as aluminum and magnesium, and is becoming increasingly popular.

Alloys such as aluminum, zinc, and magnesium are used in die casting because each one has its own set of characteristics. Aluminum, zinc, and magnesium are the most commonly used metal alloys. Die casting is made possible by the use of metal alloys such as aluminum, zinc, and magnesium, which are lightweight and strong. When it comes to shielding protection against EMI/RFI radiation, these materials provide a significant amount of shielding protection against these types of radiation.
Using die casting services has a number of advantages, the most notable of which is that they allow the creation of complex shapes such as external threads, which would otherwise be impossible to achieve using other methods. Die casting services are also cost-effective. Various sizes and shapes of die castings are available for customers to choose from. Die casting services, in addition to being more cost effective, are also less expensive than alternative methods of production. Reduced secondary operations and lower production costs are just two of the benefits that can be obtained as a result of this. In addition to these advantages, die casting has a number of other advantages, the most notable of which are as follows:
It has been shown that reducing the number of steps between raw materials and finished goods results in a significant increase in the speed with which finished goods are produced.
A significant impact has been felt on the price of scrap metal which has dropped precipitously as a result of this.
It is necessary to have extremely tight tolerances in order for the system to function correctly.
The wall thicknesses can be tailored to meet your specific needs.
As a result, the surface finish and stability of the product are enhanced, and the product's lifespan is increased as a result.
Mold casting is accomplished through the use of a mold that is permanently installed in the mold casting process.
Permanent molds for metal casting are created by milling mold cavities into metal die blocks and then modifying them so that they can be re-used multiple times during the process of making permanent molds for metal casting. To shape liquid casting metals into the desired part or component of the final product, it is necessary to make use of molds such as these.

Using permanent mold casting services for permanent molds is necessary to ensure that the product's overall dimensional stability is maintained. In order to compensate for this, the finished casting is much closer to its final specification than the raw casting. As a result, the machining tolerances for finished castings are smaller than those of raw castings. In addition to increased productivity, the higher density and tightness of the castings produced by this process compared to those produced by other methods results in a reduction in the amount of finishing and surface treatment required, resulting in savings in terms of both time and money, as well as increased productivity.
Casting in which plaster is used as the primary casting services material is a type of casting in which the plaster material is used as the primary casting material on its own.
Plaster casting, which is similar to sand casting, is a technique for creating objects out of plaster that can be used to create various objects. Whenever sand is not readily available, it is possible to make a concrete substitute out of water, calcium carbonate, and a strengthening additive, which will give the concrete more strength and durability. It is as a result of this that Abbott Interfast has gained the confidence of a large number of well-known and respected corporations in the aerospace and appliance industries, as well as the consumer goods and telecommunications industries. Please do not hesitate to get in touch with us if you require any additional information.
In the casting industry, it is possible to work in a variety of different settings, each with its own set of applications.
In addition to being extremely adaptable, it can be found in a wide range of industries, including the automotive industry, demonstrating its broad application.
Equipment intended for use in the medical and automotive industries, among other fields of endeavor.
WMDs (weapons of mass destruction) are a type of nuclear weapon that has the potential to kill millions of people in a short period of time.
In the industrial market, electronic communications equipment is used to communicate.